Now that we've completed the uncompressed header, we need to create the compressed header. Once we create it, we can find its length (in bytes) and fill in the final field in the uncompressed header that we couldn't fill during the previous chapter.
You may be wondering how compression works. There are many types of compression and they fall into 2 categories: lossy and lossless. MP3 sound and MP4 video are lossy compressors (they lose some quality) while Zip files are lossless (they don't lose anything). VP9 overall is a lossy compressor, but it includes a lossless compression step. That's what the compressed header is compressed with.
So how do we compress this header data without losing anything? We're going to use a very clever system called a range encoder. In this case it's a binary arithmetic coder because we are writing 0's and 1's.
The range encoder depends on probabilities. Don't worry, this isn't going to be hard like Prob and Stats in college. The basic rule is that a probability is a number anywhere from 0 to 1. To find a probability, we use the following formula:
P will be between 0 and 1, inclusive.
0 means guaranteed never to happen, and 1 means guaranteed to happen. Anything in between reflects a chance that something will happen.
For example, let's find the probability of getting heads when flipping a coin. You have 1 (the number of "heads" sides on a coin) divided by 2 (the number of sides on a coin). Your probability will be 1/2 or 0.5 because either side is equally likely to occur.
For another example, let's say you're watching a game show and the host spins a wheel to see if a player won a prize. If there are 50 places on the spinner and only 1 has the prize, then you have a probability of 1/50 or 0.02.
But what event are we expecting when compressing VP9? In other words, what event do we want to find the chance of? It's quite simple. We want to know the chance that the next bit in the bitstream will be 0.
Once we know that, we multiply our probability value (P, between 0 and 1) by 256 and round to the nearest whole number to get our VP9 probability. So if we have a 1 out of 50 chance (shown above) of encountering a 0 in the bitstream then P would be equal to 0.02. We multiply 0.02 by 256 to get 5.12 and round to 5. 5 is the probability we'd use to compress.
Why do I need to know the chance of finding a 0?
It's because the compressor takes two inputs: bits, and the overall chance that a bit will be 0. The output is a string of bytes that we will put in a hex editor. There are YouTube videos you can watch (one is shown below) explaining exactly why, but for simplicity's sake just accept that if you know how many 0's to expect, you can write less (a LOT less) data. What kind of "a LOT less", you ask? Like going from 100 MiB to 15 MiB without losing anything.
(Advanced theory, not necessary to continue)
Of course, this only works if the decompressor knows the probability of finding a 0, so we tell the video player beforehand. That's what the compressed header is mainly about: telling the player what the chances are of finding a 0 in the bitstream.
The decompression process is pretty straightforward, but I couldn't figure out how to reverse it and compress. Fortunately, I don't have to understand exactly how to compress and neither do you because there is free source code that does it. The license is very permissive so you can even use it in your own programs.
Because we will be using someone else's algorithm for the range compressor, all we need to worry about is what data to write, and the probability that a bit will be 0.
And, to make things easier, a lot of the time we will just pretend like we're flipping a coin by setting the probability to 0.5. That means the VP9 probability would be 128. A lot of bits in VP9 are compressed using a probability of 128. There is no compression benefit when the chances of 0 and 1 are the same, but they still do it in some parts of VP9.
[Just a reference; not necessary in this chapter] The source code we need is located at https://github.com/webmproject/libvpx/blob/master/vpx_dsp/. We are interested in the files bitwriter.c and bitwriter.h. However, at this stage it's just for reference. I've adapted the C++ code to Java and will show you the finished output. Later you will need to either copy or adapt the code so you can compress image data in bulk.
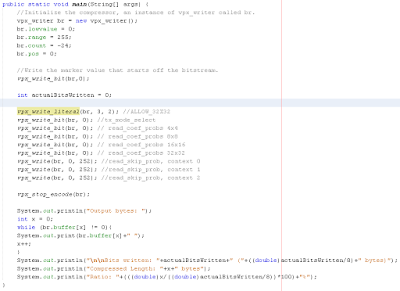
Here is the Java code we'll start with.
As you can see, we need to insert some code in the middle. See the line that says "vpx_write_bit(br, 0);"? We need to add some more lines like that. When finished, this code will compress the bits we provide into a string of bytes that it will print in the console at the bottom. When we're done, we'll enter those bytes into a hex editor.
Now that we know how to compress, we need to look at what to compress.
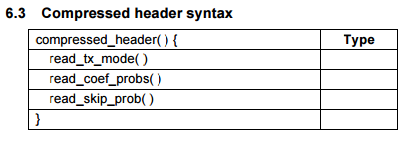
This process will be similar to what we did for the uncompressed header. I'll go bit-by-bit and explain everything. Here is what we need to encode for the compressed header.
(Taken from the VP9 Spec PDF)
We actually don't have much to encode here. We only have 3 sections: read_tx_mode, read_coef_probs, and read_skip_prob. The vast majority of what remains is for non-intra frames, which doesn't apply to what we're encoding since this is an intra frame.
So this is all we actually have to write:
First we'll collect our bits in a list like in the previous chapter. Then I'll show you how to compress them.
The idea here is that VP9 has default probabilities for everything. To avoid the complexity of having to find our probabilities and write them here, we'll just write a header that says we'll only be using default probabilities.
read_tx_mode: (All probabilities = 128)
tx_mode: 2 bits (11) for ALLOW_32X32
tx_mode_select: 1 bit (0)
read_coef_probs: (All probabilities = 128)
update_probs: 1 bit (0)
Do not update any probabilities for 4x4 transform coefficients
update_probs: 1 bit (0)
Do not update any probabilities for 8x8 transform coefficients
update_probs: 1 bit (0)
Do not update any probabilities for 16x16 transform coefficients
update_probs: 1 bit (0)
Do not update any probabilities for 32x32 transform coefficients
read_skip_prob: (All probabilities = 252)
These bits are known to be 0 most of the time, so the designers chose 252/256 as the probability of finding a 0.
Change the skip prob for context 0? 1 bit (0)
We do not want to change any probabilities, so this is 0.
Change the skip prob for context 1? 1 bit (0)
We do not want to change any probabilities, so this is 0.
Change the skip prob for context 2? 1 bit (0)
We do not want to change any probabilities, so this is 0.
Writing the code
Let's put what we've learned into action and get our VP9 bitstream moving forward again.
We have a function called vpx_write_bit(). That writes a bit to the compressed bitstream with a probability of 128. But we don't just want to write single bits; we have a multi-bit number called tx_mode at the top. How do we write that? We use a function called vpx_write_literal(). In VP9, a literal is a multi-bit number that is written with equal probability of finding a 0 or 1. The individual bits are simply written from left (most significant) to right (least significant). For example, a literal of 100 (binary) would be written as a 1 and then two 0's, in that order.
You may be wondering why there's already a vpx_write_bit(br, 0); line. Why do we start by writing a 0? Because the player expects to see a 0 at the beginning of any compressed section. If it doesn't, it will consider the bitstream invalid. The first 0 is discarded when playing the video.
Now that we've established that, we need to start writing the useful data. Let's add a line to our code:
vpx_write_literal(br, 3, 2); //ALLOW_32X32
The br is the bitwriter object, 3 is the decimal equivalent of 11 binary, and 2 means we want 2 bits.
Now we need to write some single bits.
vpx_write_bit(br, 0); //tx_mode_select
vpx_write_bit(br, 0); // read_coef_probs 4x4
vpx_write_bit(br, 0); // read_coef_probs 8x8
vpx_write_bit(br, 0); // read_coef_probs 16x16
vpx_write_bit(br, 0); // read_coef_probs 32x32
vpx_write(br, 0, 252); //read_skip_prob, context 0
vpx_write(br, 0, 252); //read_skip_prob, context 1
vpx_write(br, 0, 252); //read_skip_prob, context 2
Here's what the code should look like at the end:
Notice that we have vpx_stop_encode(br) at the end. Throughout the compression process, we are modifying a string of bytes and we need to cleanly end the compression process before we can output them.
Run the program and it will give the following output:
The single output byte, 96, is a decimal value. In hex it's 0x60. We need to ensure that a video player won't run out of bytes when it's reading the compressed header, so we'll add 1 padding byte, a value of 0, just to be safe. That would be 96 0 (decimal) or 0x60 0x00 (hex).
That means that the length of our compressed header is 2 bytes. Now we can go back and fill in the header_size_in_bytes field we skipped in the previous chapter.
Start your hex editor and open uncompressed_header, the file we saved in the last chapter.
We need to change the last 2 bytes from 00 00 to 00 02. Since the first byte was already 00, I only had to change the second one (shown in red).
Save the file. Your uncompressed header is now complete.
Compressed header in hex
This part is very easy. Create a new file in the hex editor and enter 60 00 in the hex area on the left (not the text area on the right). Make sure you're in hex mode (you will be by default; you'd know if you weren't)
You should have an empty hex file and have the text/selection cursor at the very beginning as shown.
Enter 60 00 in the hex area on the left.
Now save it as compressed_header.
I recommend moving your headers into a folder called VP9 Files.
You now have valid headers for a VP9 intra frame. The next step is to encode the image data.


