Saturday, December 23, 2017

Reading power meters with RTL-AMR

Today I got the RTL-AMR tool working and monitored some power meters. To install it, you'll need to install 2 programs: Git and Go. This program needs to be compiled by Go and that can't happen without Git.

The install instructions are mostly copied from RTL-AMR's official GitHub page.

Download Go from here. Once you've installed it, download Git from here and install it. Lastly, you'll need to make sure your RTL-SDR drivers are installed and then download and extract this ZIP file.

Go to the extracted files, open the "rtl-sdr-release" folder, choose your architecture (x32 is fine by default) and run "rtl_tcp.exe". This will produce a Command Prompt window. Leave it running.

Open another Command Prompt and enter (or Copy-Paste) go get github.com/bemasher/rtlamr.


This will produce a file called "rtlamr.exe". It should be in your "C:\Users\[username]\go\bin" folder. Drag it onto a command prompt window, press Space, and add (without brackets) [> "C:\pop.csv"]. Press Enter to run this command.

This is what it should look like when you press Enter:


That command with the right caret and "C:\pop.csv" means we want to pipe the output into a file.

Now, as long as an antenna is hooked up, it will collect power usage stats from the nearest power meters and save them into the *.CSV file.

Here's what that file should look like in Notepad++:


The Type field in the middle tells us what kind of meter we're reading. Type 7 means electric. Reddit user dongledorr says that gas meters are type 12, but I'm not picking up any of those.

I've written some programs in Liberty BASIC to process these files.

To make it easy to keep this process running, I left RTL-AMR running and just did copy-paste on C:\pop.csv. In Windows 7, this produced "C:\pop - Copy.csv". You'll need to open this copy in Notepad++ and convert the line endings to Windows-style using Edit->EOL Conversion->Windows (CR LF), or the following code won't read it.

Here's the first program to process it into an actual CSV file:


This produces C:\pop2.csv, which may be opened in Excel. You'll want to sort the data. Excel can sort by more than one column, so you'll want to specify that there's a header column, then sort primarily by ID's and secondarily by time. Then save your Excel sheet. I saved mine as C:\pop2sorted.csv.

Now you can process it into a power graph with the following program. It takes the power consumed between intervals and converts it to an average at the end of the interval.


This program doesn't produce a proper CSV file. The values are actually tab-delimited so you can easily copy-paste into Excel.

Here's what the output should look like in Notepad++:


You can copy-paste it into Excel and select a group of lines having the same ID, but only select the last 2 columns. Then insert a data graph and you should get this:


Now you have a graph showing wattage at various times. This is just the simplest way to do it. Other people have much more elaborate ways of collecting and showing the data.

Tuesday, December 12, 2017

VP9 ELI5 Part 7

Now we need to write the data for the first 32x32 block. Remember that the last chapter ended with us recursively calling decode_partition(). Now we need partition to be PARTITION_NONE because we don't want to split the 32x32 block any further.

Let's go to the beginning of decode_partition(), section 6.4.3 of the spec PDF.


Skip the first IF statement since we're not on any right or bottom boundaries.

num8x8 will be 4 since you could fit 4 8x8 blocks inside the width of a 32x32 block.
halfBlock8x8 is rather obvious: 2.
hasRows and hasCols are both TRUE.

Now let's take care of our partition field. Remember, we need it to be PARTITION_NONE.


Plugging our values into this method, we find that our first probability is 17. For PARTITION_NONE, it's quite easy. We just need to write a 0 with probability 17. Let's add that to our running tally of bits.

Running tally of bits
1, p = 10
1, p = 7
1, p = 6
0, p = 17

Continuing, subsize is going to be BLOCK_32X32, or numerically, 9.

The next line is an IF block. We want to check if subsize is smaller than 8x8 OR if partition is PARTITION_NONE. In our case, the second condition is met so we will execute the statement inside the block, decode_block(r, c, subsize).


MiRow = 0
MiCol = 0
MiSize = BLOCK_32X32
AvailU = FALSE
AvailL = FALSE

Now we need to do mode_info().


This is an intra frame so we'll execute intra_frame_mode_info().


We can skip intra_segment_id() since we chose not to enable segmentation. intra_segment will be 0.

read_skip() reads a value called skip. We want skip to be 0 because we don't want to skip over this block.


Skip is a Tree value, so we need to figure out the probabilities to use when writing it.


Since AvailU and AvailL are both FALSE, ctx will be 0. This means our probability will be skip_prob[0]. We want default_skip_prob[0] since we didn't change any probabilities. default_skip_prob[0] is 192.


The Note at the bottom is interesting because it means that this is not a tree, but instead a normal bit flag expressed as a bool value. That means all we have to do is write 0 with probability 192.

Running tally of bits
1, p = 10
1, p = 7
1, p = 6
0, p = 17
0, p = 192

Now it's time for read_tx_size(1).


allowSelect is 1, but TX_MODE_SELECT is FALSE so we'll execute the code in the ELSE block. tx_size will be the lesser of maxTxSize and tx_mode_to_biggest_tx_size[tx_mode]. tx_mode, as you may recall, has been set to ALLOW_32X32.

maxTxSize is TX_32X32.  tx_mode_to_biggest_tx_size[ALLOW_32X32] = TX_32X32. So, tx_size will be TX_32X32.

Now we have some more state variables:
     ref_frame[0] = INTRA_FRAME
     ref_frame[1] = NONE
     is_inter = 0

Now we reach an IF block that checks to see that we're working on an 8x8 block or larger. Since we are, we'll execute the statements in here and skip the ELSE block underneath.

We need to figure out default_intra_mode, which is a Tree value. Let's look at what intra modes are available.


Before we go on, you may be wondering what these intra modes do. Well, intra modes are smudge functions. You see, compressing a video isn't just about finding differences between frames. You also have to compress as much as you can within each frame. That's what "intra" compression is all about.

So in an intra frame (like the one we're encoding now), you don't just write image data. That would take a lot of space. Instead, you grab the top, left, or both top and left edges of the block and smudge them across, and then only save the difference between the actual image and the smudged block. Here is an example of all the possible smudge functions:


Let's start by getting the necessary probability.


Both abovemode and leftmode will be DC_PRED. That means our probability will be kf_y_mode_probs[DC_PRED][DC_PRED][0] which equals 137.

For simplicity, let's just write a 0 bit, which translates to DC_PRED.

Running tally of bits
1, p = 10
1, p = 7
1, p = 6
0, p = 17
0, p = 192
0, p = 137

Now we have to add some more state variables.
     y_mode = DC_PRED
     sub_modes[0 - 3] = DC_PRED

To finish up intra_frame_mode_info(), we need to write our default_uv_mode. We'll set it to DC_PRED so we can write as little as possible.


kf_uv_mode_probs[DC_PRED][0] = 144, so we need to write a 0 bit with probability 144.

Running tally of bits
1, p = 10
1, p = 7
1, p = 6
0, p = 17
0, p = 192
0, p = 137
0, p = 144

Another state variable:
     uv_mode = DC_PRED


Finally, we're done with mode_info() and we're back in decode_block().

We have another state variable,
     EobTotal = 0

The next step is residual(), which will be covered in the next chapter.

Wednesday, November 29, 2017

VP9 ELI5 Part 6

Now it's time to create the actual image data. We're at the section labeled decode_tiles(sz - headerBytes), near the bottom. These functions are deeply nested, but by the end it will only be 4 levels so don't worry if it seems like each function leads to something else.


Here's what decode_tiles() looks like.


Now we need to define some state variables. Open Notepad++ and begin by adding the lines tileCols, tileRows, MiRowStart, MiRowEnd, MiColStart, and MiColEnd. Save it as state.txt.


There are a few more to add. Just add the name (ie MiCols) and the end value, not the formulas. For example, you should have "MiCols 120".

     MiCols = (FrameWidth + 7) >> 3 = 120
     MiRows = (FrameHeight + 7) >> 3 = 68
     Sb64Cols = (MiCols + 7) >> 3 = 15
     Sb64Rows = (MiRows + 7) >> 3 = 9

We'll need to keep this updated as we go along because some future functions depend on these values and it's easy to find them at the beginning.

Now let's fill in the values. We'll start with tileCols and tileRows. They depend on log2 functions. For our image, we opted (in the uncompressed header) to leave the log2 values at 0 because 2 ^ 0 = 1 and we only want 1 tile. So, tileCols = 1 << 0 (1 left-shift 0), which equals 1. tileRows works the same way so it will also equal 1. Therefore, we have 1 tile column and 1 tile row for a total of 1 tile. Fill in tileCols and tileRows in the text file.

Do you see the nested FOR loops, for (tileRow = 0... and for (tileCol = 0...? Since we only have 1 tileCol and 1 tileRow, these will execute only once. Therefore, we can pretend these loops don't exist and just perform everything once.

The first thing being done is the statement

     lastTile = (tileRow = tileRows - 1) AND (tileCol = tileCols - 1)
     = (0 = 0) AND (0 = 0)
     = (TRUE) AND (TRUE)

Both conditions are met, so lastTile will be TRUE. Now we look at the IF block, if (lastTile). Since lastTile is TRUE, all we have to do is tile_size = sz. But don't worry about that statement. We can't know it right now anyway.

Skipping the ELSE block, we have the MiRow/MiCol statements. Let's start evaluating these. tileRow and tileCol will be 0.

     MiRowStart = get_tile_offset( tileRow, MiRows, tile_rows_log2 )
     MiRowEnd = get_tile_offset( tileRow + 1, MiRows, tile_rows_log2 )
     MiColStart = get_tile_offset( tileCol, MiCols, tile_cols_log2 )
     MiColEnd = get_tile_offset( tileCol + 1, MiCols, tile_cols_log2 )

Here's what get_tile_offset() looks like.


     MiRowStart = 0
     MiRowEnd = 68
     MiColStart = 0
     MiColEnd = 120

Copy and paste these values into your text file. You'll need them later on.

The next statement is init_bool(tile_size), but since we're encoding we don't worry about that. That's for decoders to do. What we will do, however, is start our boolean encoder once we have some values to write.

Finally, the exciting part: decode_tile(). This is where our image data will go.

decode_tile()


To decode the single tile in the image, we have 2 nested FOR loops. The outer loop iterates through Rows, and the inner loop iterates through Columns. In X/Y terms, the row is Y and the column is X. So, you can see that the outer loop runs through Y while the inner loop runs through X. These FOR loops increment in steps of 8 because the Mi series of variables represents 8-pixel increments. Incrementing these by 8 equates to incrementing by 64, the size of a superblock.

Inside the nested loops, we have clear_left_context(). This just says that every time we finish a horizontal line and jump back to the left, we have to forget everything about the previous line's left side. Notice that it's only inside the outer loop.

In the inner loop, we iterate through superblocks (64x64 blocks). That's what decode_partition(r, c, BLOCK_64X64) does. Recall at the beginning how I said that VP9 images are broken into 64x64 superblocks. This is where that happens. Basically, this loop goes left-to-right from the top to the bottom, processing superblocks.

So for the first superblock, we'll be executing the statement decode_partition(0, 0, BLOCK_64X64).


These decoding functions are already nested pretty deep. Later I'll draw a diagram to show which functions we're running.

We can forget the first IF statement since it only applies to right or bottom edges of the image.

Add the following variables to your text file:
num8x8 = 8
halfBlock8x8 = 4
hasRows = true
hasCols = true

Now here's a hard part. partition is a Tree, a binary tree specifically. A video on these is shown below. We need to encode a value that says we want PARTITION_SPLIT so we can split the superblock into 4 32x32 blocks. We could say PARTITION_NONE and it would still yield 4 32x32 blocks, but then they would share a prediction mode (smudge function) and for better compression, we want each block to specify its own prediction mode. Using PARTITION_SPLIT lets us choose on a per-block basis.


I had trouble with this part, but fortunately Ronald Bultje explained it to me and I drew a diagram of what he described. Here's my drawing of what the partition binary tree should look like.


We want Split, which breaks the block into 4 equal parts. In this case, that would break the 64x64 superblock into 4 32x32 blocks. That means we need to write 111 to the bitstream (using the bool-coder, of course).

(Advanced theory, not necessary to continue)
Credit: Ronald Bultje, in a chat with me on Nov 29, 2017


Here's the decoding side of this tree. I show it so we can work it backwards to encode.


The T[] array is the tree, which according to the spec is an array of integers. In this case it's partition_tree[] which may be found in the spec PDF.

Notice that read_bool() expects a probability, P(n >> 1). The >> is a logical shift of 1 bit, to the right. To find the probability to use when writing, we need to first run a complicated unnamed function (below).


To make a long story short, ctx will equal 15 at the end.

When the tree decoding function (9.3.3 Tree decoding process, above) first runs, n = 0. That means read_bool() will use P(0 >> 1) or just P(0) as the probability. Let's derive P(0).


hasRows = 1 (true) and hasCols = 1 (true). FrameIsIntra = 1 (true). This means we'll get our probability from partition_probs[ctx][node2]. We know that ctx is 15 and node2 = node = 0. So, we will retrieve the value partition_probs[15][0].

But there's a problem here. There's no such table as partition_probs in the VP9 spec PDF. How will we get the number we need? It turns out that we will use default_partition_probs[15][0], since we decided before that we would just use default probabilities.

default_partition_probs[15][0] = 10. So, our function will be read_bool(10). This means we need to write a 1 to the bitstream with a probability of 10. Let's keep a running tally of our bits and their probabilities, since we can't stop to write them now.

Running tally of bits
1, p = 10

Because we wrote a 1, read_bool() will return 1 when the video is decoded. Now refer to the binary tree shown above. Since we wrote a 1, we have a choice to write either 0 for a horizontal split (2 64x32's) or write another 1. We write another 1, and notice that we have to write just one more 1 to get Split.

Here are the passes the function will go through on the decode side:
  1. n starts at 0. At the end, n = 2, which equals T[0 + read_bool(P(0 >> 1))] = T[1]
  2. n starts at 2. At the end, n = 4, which equals T[2 + read_bool(P(2 >> 1))] = T[3]
  3. n starts at 4. At the end, n = 5, which equals T[4 + read_bool(P(4 >> 1))] = T[5]
Since T[5] = -PARTITION_SPLIT (negative PARTITION_SPLIT) and the loop condition is that n is above 0, we exit the loop and return PARTITION_SPLIT without the negative sign. This means the decode_partition() function (section 6.4.3, shown near the beginning) now knows that we want the current superblock to be broken into 4 32x32 blocks. The partition variable in that function will equal PARTITION_SPLIT.

Before we start writing more bits, we need to know the probabilities to use. Notice that, during our tree loop, P(n >> 1) was changing. First it was P(0), then P(1), then P(2). We know that default_partition_probs[15][0] = 10, but what about default_partition_probs[15][1] and default_partition_probs[15][2]? Well, those are 7 and 6, respectively. The designers knew that the chance of a 0 diminishes as we go further down the tree, so they set the default probabilities accordingly.

Now that we have our probabilities, let's add the bits to our list.


Running tally of bits
1, p = 10
1, p = 7
1, p = 6

That was quite a lot. So where are we? Now that we know how to tell the video player that we want 4 32x32 blocks, we can go back to section 6.4.3, decode_partition().

Just under partition is subsize = subsize_lookup[ partition][ bsize ]. We know partition now, so we can plug it in. bsize is BLOCK_64X64. Basically, subsize_lookup lets us plug in a partition type along with our current block size and see how big the resulting block(s) would be. In our case, subsize will be 9 which corresponds to BLOCK_32X32.

Now we have a bunch of IF statements to go through. The first one checks if subsize is less than 8x8 or equal to 64x64. Neither of those is the case, so we move on to check if it's a horizontal split (64x32 in our case) and then we check if it's a vertical split (32x64 in our case). The ELSE block at the end of the IF statement reflects that if none of those conditions were met, which they weren't, then the only other possibility is a PARTITION_SPLIT.

Notice that inside the ELSE block, we have 4 decode_partition() statements. These are processed in raster order within the superblock. This means that superblocks are processed in raster order, and blocks within superblocks are processed the same way.

We're done here since we're calling decode_partition() again. When a function calls itself, as decode_partition() is doing right now, it's called recursion. In this case we have to recursively call ourselves to decode each of the 4 32x32's. Now would be a good time for a diagram of where we are.


Saturday, October 7, 2017

VP9 ELI5 Part 5

This is a challenging chapter. If anything is unclear, please leave a comment. Having Q/A under the post will benefit everyone.

Now that we've completed the uncompressed header, we need to create the compressed header. Once we create it, we can find its length (in bytes) and fill in the final field in the uncompressed header that we couldn't fill during the previous chapter.

You may be wondering how compression works. There are many types of compression and they fall into 2 categories: lossy and lossless. MP3 sound and MP4 video are lossy compressors (they lose some quality) while Zip files are lossless (they don't lose anything). VP9 overall is a lossy compressor, but it includes a lossless compression step. That's what the compressed header is compressed with.

So how do we compress this header data without losing anything? We're going to use a very clever system called a range encoder. In this case it's a binary arithmetic coder because we are writing 0's and 1's.

The range encoder depends on probabilities. Don't worry, this isn't going to be hard like Prob and Stats in college. The basic rule is that a probability is a number anywhere from 0 to 1. To find a probability, we use the following formula:

P will be between 0 and 1, inclusive.

0 means guaranteed never to happen, and 1 means guaranteed to happen. Anything in between reflects a chance that something will happen.

For example, let's find the probability of getting heads when flipping a coin. You have 1 (the number of "heads" sides on a coin) divided by 2 (the number of sides on a coin). Your probability will be 1/2 or 0.5 because either side is equally likely to occur.

For another example, let's say you're watching a game show and the host spins a wheel to see if a player won a prize. If there are 50 places on the spinner and only 1 has the prize, then you have a probability of 1/50 or 0.02.

But what event are we expecting when compressing VP9? In other words, what event do we want to find the chance of? It's quite simple. We want to know the chance that the next bit in the bitstream will be 0.

Once we know that, we multiply our probability value (P, between 0 and 1) by 256 and round to the nearest whole number to get our VP9 probability. So if we have a 1 out of 50 chance (shown above) of encountering a 0 in the bitstream then P would be equal to 0.02. We multiply 0.02 by 256 to get 5.12 and round to 5. 5 is the probability we'd use to compress.

Why do I need to know the chance of finding a 0?

It's because the compressor takes two inputs: bits, and the overall chance that a bit will be 0. The output is a string of bytes that we will put in a hex editor. There are YouTube videos you can watch (one is shown below) explaining exactly why, but for simplicity's sake just accept that if you know how many 0's to expect, you can write less (a LOT less) data. What kind of "a LOT less", you ask? Like going from 100 MiB to 15 MiB without losing anything.

(Advanced theory, not necessary to continue)


Of course, this only works if the decompressor knows the probability of finding a 0, so we tell the video player beforehand. That's what the compressed header is mainly about: telling the player what the chances are of finding a 0 in the bitstream.

The decompression process is pretty straightforward, but I couldn't figure out how to reverse it and compress. Fortunately, I don't have to understand exactly how to compress and neither do you because there is free source code that does it. The license is very permissive so you can even use it in your own programs.

Because we will be using someone else's algorithm for the range compressor, all we need to worry about is what data to write, and the probability that a bit will be 0.

And, to make things easier, a lot of the time we will just pretend like we're flipping a coin by setting the probability to 0.5. That means the VP9 probability would be 128. A lot of bits in VP9 are compressed using a probability of 128. There is no compression benefit when the chances of 0 and 1 are the same, but they still do it in some parts of VP9.

[Just a reference; not necessary in this chapter] The source code we need is located at https://github.com/webmproject/libvpx/blob/master/vpx_dsp/. We are interested in the files bitwriter.c and bitwriter.h. However, at this stage it's just for reference. I've adapted the C++ code to Java and will show you the finished output. Later you will need to either copy or adapt the code so you can compress image data in bulk.

Here is the Java code we'll start with.


As you can see, we need to insert some code in the middle. See the line that says "vpx_write_bit(br, 0);"? We need to add some more lines like that. When finished, this code will compress the bits we provide into a string of bytes that it will print in the console at the bottom. When we're done, we'll enter those bytes into a hex editor.

Now that we know how to compress, we need to look at what to compress.

This process will be similar to what we did for the uncompressed header. I'll go bit-by-bit and explain everything. Here is what we need to encode for the compressed header.

(Taken from the VP9 Spec PDF)

We actually don't have much to encode here. We only have 3 sections: read_tx_mode, read_coef_probs, and read_skip_prob. The vast majority of what remains is for non-intra frames, which doesn't apply to what we're encoding since this is an intra frame.

So this is all we actually have to write:


First we'll collect our bits in a list like in the previous chapter. Then I'll show you how to compress them.

The idea here is that VP9 has default probabilities for everything. To avoid the complexity of having to find our probabilities and write them here, we'll just write a header that says we'll only be using default probabilities.

read_tx_mode: (All probabilities = 128)
      tx_mode: 2 bits (11) for ALLOW_32X32
      tx_mode_select: 1 bit (0)

read_coef_probs: (All probabilities = 128)
      update_probs: 1 bit (0)
      Do not update any probabilities for 4x4 transform coefficients

      update_probs: 1 bit (0)
      Do not update any probabilities for 8x8 transform coefficients

      update_probs: 1 bit (0)
      Do not update any probabilities for 16x16 transform coefficients

      update_probs: 1 bit (0)
      Do not update any probabilities for 32x32 transform coefficients

read_skip_prob: (All probabilities = 252)
These bits are known to be 0 most of the time, so the designers chose 252/256 as the probability of finding a 0.

      Change the skip prob for context 0? 1 bit (0)
      We do not want to change any probabilities, so this is 0.

      Change the skip prob for context 1? 1 bit (0)
      We do not want to change any probabilities, so this is 0.

      Change the skip prob for context 2? 1 bit (0)
      We do not want to change any probabilities, so this is 0.

Writing the code

Let's put what we've learned into action and get our VP9 bitstream moving forward again.


We have a function called vpx_write_bit(). That writes a bit to the compressed bitstream with a probability of 128. But we don't just want to write single bits; we have a multi-bit number called tx_mode at the top. How do we write that? We use a function called vpx_write_literal(). In VP9, a literal is a multi-bit number that is written with equal probability of finding a 0 or 1. The individual bits are simply written from left (most significant) to right (least significant). For example, a literal of 100 (binary) would be written as a 1 and then two 0's, in that order.

You may be wondering why there's already a vpx_write_bit(br, 0); line. Why do we start by writing a 0? Because the player expects to see a 0 at the beginning of any compressed section. If it doesn't, it will consider the bitstream invalid. The first 0 is discarded when playing the video.

Now that we've established that, we need to start writing the useful data. Let's add a line to our code:

      vpx_write_literal(br, 3, 2); //ALLOW_32X32

The br is the bitwriter object, 3 is the decimal equivalent of 11 binary, and 2 means we want 2 bits.

Now we need to write some single bits.

vpx_write_bit(br, 0); //tx_mode_select
vpx_write_bit(br, 0); // read_coef_probs 4x4
vpx_write_bit(br, 0); // read_coef_probs 8x8
vpx_write_bit(br, 0); // read_coef_probs 16x16
vpx_write_bit(br, 0); // read_coef_probs 32x32
vpx_write(br, 0, 252); //read_skip_prob, context 0
vpx_write(br, 0, 252); //read_skip_prob, context 1
vpx_write(br, 0, 252); //read_skip_prob, context 2


Here's what the code should look like at the end:


Notice that we have vpx_stop_encode(br) at the end. Throughout the compression process, we are modifying a string of bytes and we need to cleanly end the compression process before we can output them.

Run the program and it will give the following output:


The single output byte, 96, is a decimal value. In hex it's 0x60. We need to ensure that a video player won't run out of bytes when it's reading the compressed header, so we'll add 1 padding byte, a value of 0, just to be safe. That would be 96 0 (decimal) or 0x60 0x00 (hex).

That means that the length of our compressed header is 2 bytes. Now we can go back and fill in the header_size_in_bytes field we skipped in the previous chapter.

Start your hex editor and open uncompressed_header, the file we saved in the last chapter.


We need to change the last 2 bytes from 00 00 to 00 02. Since the first byte was already 00, I only had to change the second one (shown in red).


Save the file. Your uncompressed header is now complete.

Compressed header in hex

This part is very easy. Create a new file in the hex editor and enter 60 00 in the hex area on the left (not the text area on the right). Make sure you're in hex mode (you will be by default; you'd know if you weren't)

You should have an empty hex file and have the text/selection cursor at the very beginning as shown.


Enter 60 00 in the hex area on the left.


Now save it as compressed_header.

I recommend moving your headers into a folder called VP9 Files.


You now have valid headers for a VP9 intra frame. The next step is to encode the image data.

Wednesday, October 4, 2017

VP9 ELI5 Part 4

Okay, so now that we've examined what RAW video data is composed of, we can get to work creating a valid VP9 video file.

For this step, we'll need to look at the VP9 bitstream specification PDF. Don't worry, I'll walk you through the whole thing. But first, read the section on video containers.

Video Containers

Once we have a valid VP9 frame we will need a container to hold our finished VP9 video. A container is simply a file format that contains information for a video player like Media Player Classic to find individual frames in a file that would otherwise have been RAW.

Good container examples are *.MP4 and *.WAV files. MP4 isn't actually a video format, it's a file structure that can contain several different video formats, such as H.264. In a similar way, WAV isn't an audio format, it's simply a file that contains information about how to play RAW audio, usually LPCM.

We will be using an *.IVF (Indeo Video File) video container to hold our finished VP9 stream. It's really simply and easy to build in a hex editor.

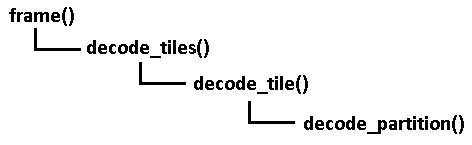
Putting together a VP9 video

A standard VP9 bitstream is not a whole video as you might have assumed, but instead an individual frame. Think of a container (in our case, *.IVF file) as a ZIP archive with individual images. When encoding VP9, instead of compressing the entire video into one bitstream, we encode one frame, write it to the container file, and repeat until the end.

So a VP9 bitstream is just one frame. Here is how it is structured:

Adapted from the VP9 Bitstream Specification PDF.

We start with the uncompressed header (easy to generate), then write the compressed header, and finally start writing tile (image) data.

Advanced info: For simplicity and coding efficiency, we will only be dealing with 1 tile in our VP9 frames.

Here's the structure of a VP9 frame in text form. Don't worry that this doesn't make sense yet. We'll go bit-by-bit (literally).


Let's open Notepad++ and get started hand-crafting our bitstream.

We'll skip the first line startBitPos = get_position() and move on to uncompressed_header().

The bitstream spec defines different data structures depending on certain video parameters, so we need to define our parameters beforehand. We know it's a 960x540 image, but what Profile will the video be? VP9 supports 4 profiles, 0-3. Profile 0 is the default that YouTube videos are saved as. It can only carry 8-bit YUV 4:2:0. Profile 2 (the third profile) supports 10-bit pixels with YUV 4:2:0 color, so we'll be using Profile 2.

Here are the parameters we need to write, in order, in our case.

Uncompressed Header


frame_marker: 2 bits (1 0)
Always the case

profile_low_bit: 1 bit (0)
profile_high_bit: 1 bit (1)

Since Profile is 2 and 2 in binary is 10, the high bit is 1 and the low bit is 0.

show_existing_frame: 1 bit (0)
We are not trying to show a previously-decoded frame

frame_type: 1 bit (0)
0 means key frame, or initial image

show_frame: 1 bit (1)
Yes, we want to show the frame

error_resilient_mode: 1 bit (1)
Enable error resilient mode

Since frame_type = 0 (keyframe),
      frame_sync_code: 24 bits (01001001 10000011 01000010)
      color_config:
            ten_or_twelve_bit: 1 bit (0)
            0 because this is 10-bit data.

            color_space: 3 bits (010)
            Color space equals 2 (binary 010) for BT.709

            color_range: 1 bit (0)
            This designates Studio Swing, the 16-235 and 64-940 range limit we discussed earlier.
            However, it is not enforced by the VP9 spec. It must be enforced by players.

      frame_size:
            frame_width_minus_1: 16 bits (0000001110111111)
            959 in binary form

            frame_height_minus_1: 16 bits (0000001000011011)
            539 in binary form

      render_size:
            render_and_frame_size_different: 1 bit (0)
            The render size will be the same as the frame size, 960x540

frame_context_idx: 2 bits (00)
Save our frame context into the 0 position
(not really important since we reset after each frame)

loop_filter_params:
      loop_filter_level: 6 bits (000011)
      Let's set this to 3 (11 binary)

      loop_filter_sharpness: 3 bits (011)
      Let's set this to 3 (11 binary)

      loop_filter_delta_enabled: 1 bit (0)
      Do not enable loop filter delta (being able to change the loop filter for
      different parts of the image)

quantization_params:
      base_q_idx: 8 bits (00000001)
      Base quantizer (divisor for shrinking large values later on)
      This provides the lossy part of VP9 compression. I've set it to 1 because
      this is more about understanding the format and creating a valid image than
      about compressing.

      delta_coded: 1 bit (0)
      No change to the quantizer required for the DC component of transforms of B/W image
      (transforms are covered later)

      delta_coded: 1 bit (0)
      No change to the quantizer required for the DC component of transforms of
      color add-on data

      delta_coded: 1 bit (0)
      No change to the quantizer required for the AC components of transforms of
      color add-on data

segmentation_params:
      segmentation_enabled: 1 bit (0)
      Segmentation is a really cool feature but for simplicity we won't be using it.

tile_info:
      increment_tile_cols_log2: 1 bit (0)
      Do not increment that variable. Keep it at 0 since 2 ^ 0 = 1 and we only want 1 tile column.

      tile_rows_log2: 1 bit (0)
      Do not increment that variable. Keep it at 0 since 2 ^ 0 = 1 and we only want 1 tile row.

header_size_in_bytes: 16 bits (Can't know it yet; must complete next chapter first)
We'll pretend it's 16 0's (0000000000000000) for now.


Putting it together


So if you enter all these bits in order into Notepad++, you should start to have something like this:

(Obviously I superimposed this blog entry over Notepad++; I did not somehow manage to type formatted text in there)

Putting spaces between the fields is optional. I did it for clarity.

Anyway, once you've entered all the bits into Notepad++ (including the 16 0's for the end data we don't know), then you will need to press Ctrl+H to get the Find/Replace dialog if you added spaces. Skip this paragraph if you didn't add spaces. Clear the search field and press the spacebar once. Clear the Replace With field and press Replace All. Now there shouldn't be any spaces in the file.

Now that the spaces are gone, look at the status bar at the bottom of the window. If you entered the bits properly and removed any spaces, it should say Length: 112.


112 is divisible by 8 so this will fit in 14 bytes (112 / 8) without a need for extra empty bits to make a whole byte.

Now you'll need to separate the string of bits into groups of 8. Just start at the beginning, use your left arrow key to advance 8 characters, press Enter, and repeat. I know this is tedious, but don't worry, we only do this once.

It should look like this when it's done.


Now you can either manually copy-paste this one-by-one into MS Calculator in Bin mode and convert to Dec (tedious), or you can copy-paste the whole list into the top box at https://www.textfixer.com/numbers/binary-to-decimal.php (recommended) and use that tool to get the whole list at once.


Now open a hex editor with decimal input support, such as HHD Hex Editor Neo. Create a new file, press Ctrl+1 (for Hex Editor Neo) to set it to decimal mode, click in the first blank entry in the large area on the left and start typing these numbers in order, pressing Enter after each one.


Save this file as "uncompressed_header". We will come back to it after we finish the next chapter.